
Monday, February 20, 2012
Saturday, February 18, 2012
Brunswick Stew Recipe or what I like to call How to Get Joel to eat Leftover BBQ
I have really had some good luck with the recipes this lady posts on her website. Especially for the crockpot. (I consider it good luck with Joel and the boys eat it and say it's a keeper.) Here is the link for the Brunswick Stew recipe which may be a recipe popular in the south but it is really good!
http://afewshortcuts.com/2009/08/weekly-meal-deal-night-2-brunswick-stew-2/
Let me know if you try it out and if your guys like it as much as mine.
http://afewshortcuts.com/2009/08/weekly-meal-deal-night-2-brunswick-stew-2/
Let me know if you try it out and if your guys like it as much as mine.
Monday, January 30, 2012
TOPIC: Buffalo Chicken Rolls 103 calories
Did you guys see this receipe on MYFITNESSPAL.COM?
I want to try them
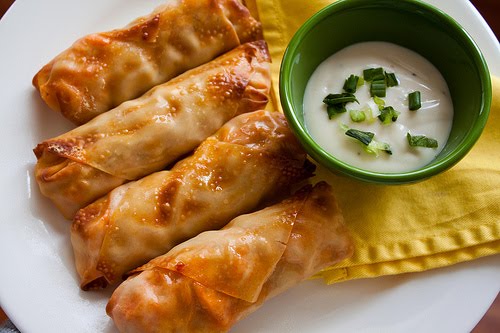
TOPIC: Buffalo Chicken Rolls 103 calories
I made these the other night and they were so yummy! (and quick to bake)
 12 egg roll wrappers (roughly 4 square inches)
1 cup cooked and shredded chicken (6 ounces)
1/2- 2/3 cup Frank’s Red Hot Sauce
1 cup crumbled blue cheese (4 ounces)
1 cup broccoli slaw or cole slaw (dry)
Small bowl of water
Nonstick cooking spray
Blue cheese dressing, for serving
Preheat oven to 400 degrees F. Lay egg roll wrappers on a clean work surface. In a small bowl, stir chicken* (see note below) and hot sauce until well coated, using more or less sauce depending on your spice preference. The meat should be moist with sauce.
Begin by placing one tablespoon of the broccoli slaw on the diagonal of the bottom right corner of one of the wrappers. Next, place 2 tablespoons of shredded spicy chicken evenly on top of the slaw. Spoon 1 tablespoon of the blue cheese crumbles over the chicken. Do not overfill.
To fold: Fold the bottom right corner over the stuffing mixture so that it covers it completely, with the tip of the corner now pointing to the center of the egg roll wrapper. Fold in the bottom left corner, followed by the right, so that you now have formed an envelope. Roll the wrap upward one time, leaving the top left corner open. Wet your index finger in the small bowl of water and press to moisten the top left corner. Now fold that down on top of the filled roll, sealing it like you would an envelope.
Place the rolls on a wire rack set on top of a cookie sheet (or just on a greased cookie sheet) coated with nonstick cooking spray. Spritz each roll evenly with nonstick cooking spray. Bake for 12-15 minutes, or until the rolls crisp and turn a light golden brown.
**Nutrition Information for 1 roll: Calories: 103, Fat: 3.2g, Cholesterol 19.5mg, Sodium 237.7mg, Carb: 9.9g, Fiber: 0.5g, Sugars: 0.3g, Protein: 8.1g
12 egg roll wrappers (roughly 4 square inches)
1 cup cooked and shredded chicken (6 ounces)
1/2- 2/3 cup Frank’s Red Hot Sauce
1 cup crumbled blue cheese (4 ounces)
1 cup broccoli slaw or cole slaw (dry)
Small bowl of water
Nonstick cooking spray
Blue cheese dressing, for serving
Preheat oven to 400 degrees F. Lay egg roll wrappers on a clean work surface. In a small bowl, stir chicken* (see note below) and hot sauce until well coated, using more or less sauce depending on your spice preference. The meat should be moist with sauce.
Begin by placing one tablespoon of the broccoli slaw on the diagonal of the bottom right corner of one of the wrappers. Next, place 2 tablespoons of shredded spicy chicken evenly on top of the slaw. Spoon 1 tablespoon of the blue cheese crumbles over the chicken. Do not overfill.
To fold: Fold the bottom right corner over the stuffing mixture so that it covers it completely, with the tip of the corner now pointing to the center of the egg roll wrapper. Fold in the bottom left corner, followed by the right, so that you now have formed an envelope. Roll the wrap upward one time, leaving the top left corner open. Wet your index finger in the small bowl of water and press to moisten the top left corner. Now fold that down on top of the filled roll, sealing it like you would an envelope.
Place the rolls on a wire rack set on top of a cookie sheet (or just on a greased cookie sheet) coated with nonstick cooking spray. Spritz each roll evenly with nonstick cooking spray. Bake for 12-15 minutes, or until the rolls crisp and turn a light golden brown.
**Nutrition Information for 1 roll: Calories: 103, Fat: 3.2g, Cholesterol 19.5mg, Sodium 237.7mg, Carb: 9.9g, Fiber: 0.5g, Sugars: 0.3g, Protein: 8.1g
Saturday, January 28, 2012
Skiing
Tips for first-time skiers (and instructors of first-time skiers)
http://www.tomsarazac.com/tom/opinions/firsttimeski.html
Real tips? Weight over the balls of your feet. Pressure on your shins. Hands forward. Eyes forward.
ONLINE SKI LESSONS
http://mogulmick.vbmco.com/begin.html
http://www.mechanicsofsport.com/skiing.html
http://www.abc-of-skiing.com/learn-skiing/
Common Mistakes
http://www.mechanicsofsport.com/skiing/learning_to_ski/common_mistakes.html
SUMMARY
Below is a brief summary of the basic mechanics section, so that the main concepts can be gone over again, or quickly learnt if you have not been able to look at the whole basic mechanics section. To know about any of the concepts in any detail though, the pages for them need to have been read.
http://www.mechanicsofsport.com/skiing/basic_mechanics/summary.html
STANCE
http://www.mechanicsofsport.com/skiing/basic_mechanics/stance.html
Skis hip width apart, the same weight on each ski, knees bent to absorb bumps, the body leaning slightly forward to put your weight over the middle of the skis (and making it able to flex in both directions), looking forward with your arms out to the sides slightly in front of you with the elbows slightly bent. The amount of forwards lean will obviously change depending on how steep the slope is, so that the centre of gravity is kept over the middle of the ski.
6 Steps to Effortless Skiing
http://www.howtoski.net/sub_6steps.html
The most obvious difference between accomplished and less accomplished skiers is always the shape of their turns. The better the skier, the rounder the arc of their turn. Why are they so important?
http://www.breakthroughonskis.com/Pages/_ski_instruction/instruction01.html
Let me start my explanation of this mystery by saying that there are really two reasons why skiers turn. One, of course, is to change direction, but equally important, we turn to control our speed
How to master ski parallel turns
http://www.abc-of-skiing.com/learn-skiing/linking-turns.asp
http://www.helium.com/items/792656-how-to-master-ski-parallel-turns
http://www.helium.com/items/791747-how-to-master-ski-parallel-turns
http://www.abc-of-skiing.com/learn-skiing/
EDGE PRESSURE
http://www.mechanicsofsport.com/skiing/basic_mechanics/edge_pressure.html
Initiating The Turn
http://www.mechanicsofsport.com/skiing/basic_mechanics/using_resistance.html
Finishing The Turn IS VERY IMPORTANT!
LONGITUDINAL WEIGHT DISTRIBUTION
http://www.mechanicsofsport.com/skiing/basic_mechanics/longitudinal_weight.html
Middle of the Skis
The edges of the skis are where most of our control comes from, and to use the edges properly we must push them into the snow evenly along their length. This means that we need our weight in the middle of the ski, otherwise our weight will not be distributed evenly.
You can tell if you have your weight in the right position, as if you do you will be able to feel your shins pushing lightly on the front of your ski boots. If you can not feel your shins on the front of your ski boots, you are leaning back too much, and need to lean forwards more. Obviously it is also possible to lean forwards too much, although this very rarely happens, and if you do you should be able to realise by the very large amount of pressure on your shins.
LATERAL WEIGHT DISTRIBUTION
http://www.mechanicsofsport.com/skiing/basic_mechanics/lateral_weight.html
The more weight is put over a ski, the quicker you will reach the sideways position as well. This is all assuming that your weight is in the middle of the ski lengthways, otherwise longitudinal weight distribution will be coming into play as well.
how to carve on skis
http://www.therusty.com/shape_ski_article.htm
http://www.youtube.com/watch?v=UGn62uxnhjg&feature=mfu_in_order&list=UL
Shaped skis are for everyone regardless of ability. Because of the contour of the skis, wide at the ends, thin in the middle, the ski turns with less effort.
The dramatic hourglass shape of today’s skis make it much easier to carve turns at lower speeds; tip them on edge and it feels like they do the rest of the work. Though they still give the same thigh-burning workout, now you’ll be making tighter, more controlled turns between first tracks and apres ski.
TRUST THE SKI TO TURN
http://www.skitips.com/top-tips-intermediate.html
Special Tip
Don’t try to turn the skis by turning your feet in the direction of the turn! Be patient and try to feel yourself ‘riding’ on the edges of the skis as they turn. (The skis turn when you put them on their edges because of their shape and design).
http://www.youtube.com/watch?v=DTkyqZjUMYQ
With sufficient momentum in the traverse, after the skier's weight is transferred to the uphill ski and its big-toe edge bites into the snow, it will want to start turning all by itself because of the shape of its sidecut. It is very important to be patient and allow the turn to develop naturally, instead of rushing it with twisting movements of the body or feet or forcing the turn around with the outside hand and shoulder. Focus on keeping both skis parallel, without changing their direction, and let the turn happen of its own accord. As soon as weight has been transferred to the uphill ski and it has been tilted onto its big-toe edge, extend the outside leg to put pressure on the outside ski.
Tilting the weighted ski onto its big-toe edge is facilitated by tilting the light ski onto its little-toe edge. This is an extremely important maneuver. Think in terms of the light ski tilting onto its little-toe edge to initiate the turn. To turn left, the left ski is made light and tilted onto its left little-toe edge. To turn right, the right ski is made light and tilted onto its right little-toe edge. The combination of transferring weight and pressuring the outside ski's big-toe edge by extending the outside leg while maintaining strong contact between shin and boot tongue, is what makes the ski carve a turn, rather than skid, provided one has tilted the ski onto a high enough edge angle.
The shape ski primer for skiers who have missed the revolution.
If you have not been on snow skis in the last 10 years, you’ve missed the “shaped ski” revolution. Maybe you’ve heard how much more fun skiing is these days and you’ve decided to try it again. Welcome back! You’ve got some catching up to do. Since 2000 almost every ski sold in ski shops has been a “shaped” ski. By now most of the active skiers have already switched to the new technology and adjusted their technique. If you’ve got an old pair of skis in the closet, forget about them because 10 year old skis are even more useless than a 10 year old PC. Buy, borrow or rent, but get yourself on new gear. Now all you need to do is upgrade your technique. Most of you just need a few simple tips and you’ll be having more fun than ever before.
Carving!
These days everyone is ranting and raving about carving. In a carved turn, the tail of the ski passes through the same point in the snow as the tip of the ski, leaving a pencil thin track in the snow. When you carve a turn, you will feel a “G” force. It’s really cool. With straight skis, only giant slalom and downhill skiers were carving their turns because you needed a lot of room and a lot of speed. Shape skis have a shorter turn radius than straight skis. They can carve turns at much slower speeds and shorter distances than straight skis can. This brings carving into the realm of recreational skiers. When you carve a turn, you use much less energy than when you skid through a turn. Skiers on shape skis don’t get as tired as when they used straight skis. When you carve a turn, you’ve got much greater control over your skis than when you skid through a turn. This added sense of control and that G force thing are what makes skiing more fun than it used to be. You don’t have to leave pencil thin carved tracks on every turn to have fun. The less you skid your skis, the more you “zip” you will feel. Be careful though, when you carve you will be moving faster side to side and completing your turns more up the hill than what you are used to. You need to make sure that you give yourself extra room to avoid other skiers and the sides of the trails.
http://www.youtube.com/watch?v=vlzIkIQa3e0
http://www.mechanicsofsport.com/skiing/manoeuvres/carving.html
http://www.skienthusiast.com/instruction.htm
Safety First - Here are few brief tips to ensure your safety on the mountain:
1) Wear a helmet ... they really help prevent head injuries ...
2) Before proceeding down the mountain, look up the mountain for oncoming skiers and respect their right of way.
3) Always stop in an area that oncoming skiers can see you, preferably off to the side of heavily skied areas.
4) Always stay in control of your speed and respect designated slow skiing areas.
5) Remove your pole straps before getting on to the lift.
6) If you totally lose control, purposely fall (preferably to the side) to avoid leaving the trail and/or hitting a tree, lift tower or snow making equipment. Back to Top
Stance - Stance is critical to becoming an expert skier. Let's review the basic stance:
1) Forward, Forward, Forward ... The top reason skiers have difficulty with advanced terrain is that they have fallen back in their stance. Unfortunately, this is a natural reaction to fear. It is critical to stay forward when you are skiing at all times. So what does forward mean? In a proper stance your chest should be directly above your toes with a slight bend at the waist. This will adjust some when you're skiing, but it is a good mind set.
2) There should be a slight bend in your knees and your shins should apply a comfortable pressure to the front of the boot.
3) Keep your poles out in front of you and to the side, with arms slightly bent and your elbows in line with the front of your chest and 7-8 inches from your sides.
4) Keep your chin and eyes up and be ready to anticipate turn shapes
Turning Basics - There are really only a few skills you need to make elegant parallel turns.
http://www.skienthusiast.com/turning.htm
1) Your skis should be 6-10 inches apart (this will vary some with different terrain).
2) Parallel turns are completed by rolling your ski from edge to the other edge using your legs and hips. To visualize this, roll your foot from your big toe to your little toe (or vice versa) with more pressure on the balls of your feet. When you roll your shaped ski, it will naturally carve the snow and make the turn as you slide down the mountain. Apply slightly more pressure on your outside ski (60% outside, 40% inside). Your inside knee should bend more and move slightly forward of your outside knee as you go through the turn. As you transition from one turn to the next, there will be a moment or two when your skis are perfectly flat with the snow.
3) If you want to make a shorter radius turn, actively steer with your lower body by pushing your heels out to one side while rolling your skis. To visualize this, sit in a chair with your feet off the ground and kick both of your heels to the right and then to your left, simulating a windshield wiper.
4) You may notice that the inside ski is tougher to roll and push the heel out. This happens with everyone I know when they began. Later, I will provide some drills to strengthen this movement. For now, do several runs without your poles on easy terrain. When you feel your inside ski start to drag, give it a little help by pushing outward on your inner thigh with your hand.
5) Again keep your poles out in front of you, arms slightly bent and your elbows 7-8 inches from your sides keeping your upper body steady as you move in and out of your turns. It is helpful to plant your inside pole and ski around it (don't let your poles drag behind you).
6) After you get comfortable with single turns begin to link your turns and play with their size.
7) Again it is important to keep your shins against the front of the boot, your chest over your toes and move your body down the mountain as you roll your skies.
8) To stop, tighten the radius of your turn (slightly more roll of the ski) putting more pressure on your edges and bringing your skis perpendicular to the downward slope of the hill by pushing out your heels in the same direction (as described above). This is a little tricky at first but will become easier after a few tries. However, it is essential to master this before you attempt challenging blues.
http://youcanski.com/en/instruction/instruction_index.htm
http://www.weekendwarriorsguide.com/svmm.htm#Dec.09_SKI_LESSON_OF_THE_MONTH:_Ten_Things_Expert_Skiers_do_Differently_when_compared_to_Intermediates
Friday, December 02, 2011
For Ats; that youtube math tutor
math tutorial salman khan
http://www.youtube.com/watch?v=HkMS6Glswig
http://www.youtube.com/watch?v=HkMS6Glswig
Sunday, November 13, 2011
I started using Swagbucks again and signed up for netflix!
I started using swagbucks as my home page again. I had a little under 1300 points with which I was able to redeem $10.00 Amazon gift cards.I haven't used swagbucks in a year so I was impressed that I still had an account with them. I found out that you can apply the gift cards to your amazon account which doesn't expire and you can have waiting for your next amazon purchase.
I got 1000 swagbucks for signing up for netflix for one month trial period. if i decide to keep it, $7.99 a month for netflix.
I got 1000 swagbucks for signing up for netflix for one month trial period. if i decide to keep it, $7.99 a month for netflix.
Chicken Carbonara Alfredo with Broccoli
I roasted a whole chicken a few nights ago. I stuffed a couple of lemons and garlic cloves up it's bum and rubbed it with poultry seasoning. I made giblet gravy with the giblits, liver and a few hard boiled eggs too. The gravy was my favorite part.
I shredded the leftover chicken tonite and used the creamy alfredo sauce packet that was in my cabinet. I threw in some bacon crumbles I keep in my freezer and some sliced mushrooms from Trader Joe's. I boiled some broccoli florets (on sale @ giant eagle) in the same sauce pan I later threw in some angel hair pasta. Dinner was made in less than 15 minutes!!! and cheap. So cheap.
I shredded the leftover chicken tonite and used the creamy alfredo sauce packet that was in my cabinet. I threw in some bacon crumbles I keep in my freezer and some sliced mushrooms from Trader Joe's. I boiled some broccoli florets (on sale @ giant eagle) in the same sauce pan I later threw in some angel hair pasta. Dinner was made in less than 15 minutes!!! and cheap. So cheap.
Sunday, November 06, 2011
i'm obsessed with extreme....couponing
i know how lame that sounds.
Here's what I've been studying:
http://simplyfrugalliving.com/about/couponing-101/
http://savingslifestyle.com/welcome/
here's my cheat sheet:
http://www.stretchingabuckblog.com/grocery-deals/giant-eagle
http://momsneedtoknow.com/drug-store-deals/
My drugstore is Rite Aid because it's only a block away from my house.
Subscribe to:
Posts (Atom)